
It started, as many good baking ideas do, with a moment of mild obsession at a local Italian restaurant—one of those places where the bread arrives quietly, but steals the entire show. Thick slices, rustic and unapologetic, begging to be torn apart and dragged through olive oil, balsamic vinegar, and a generous scoop of ricotta sitting proudly in the center of the plate. I went home with a mission: recreate that exact experience.
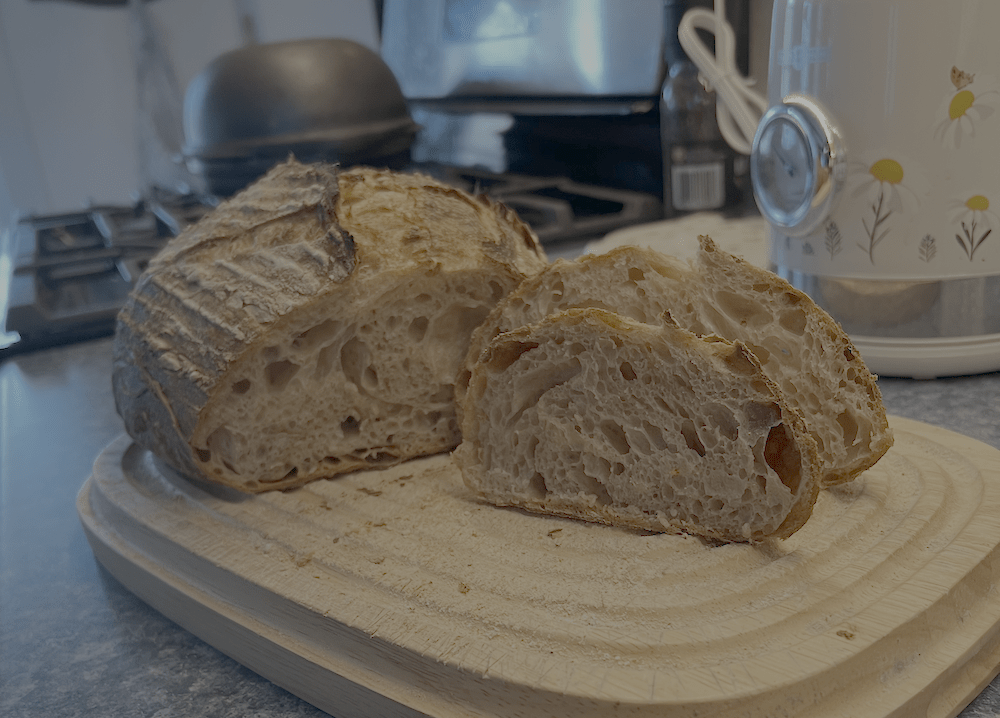
The result is what I now call my “Tuscon Table Loaf”—a sourdough bread with a chewy, elastic bite, an airy crumb riddled with beautiful holes, and a flavor that leans confidently on stone-ground bread flour. It’s not just bread—it’s an invitation to linger at the table a little longer.
The Ingredients
- 280g King Arthur Bread Flour – Provides the high protein strength needed to build a strong gluten network, giving the dough structure, elasticity, and the ability to trap gas for a light, open crumb.
- 120g Ground Up Bread Flour – Contributes deeper flavor and subtle texture, thanks to its retained bran and germ, enhancing both the taste and character of the loaf.
- 320g Warm Water – Hydration = 80% due to use of stone-ground flour, which requires more water.
- 80g Sourdough Starter – 20% of total flour weight
- 8g Salt – 2% of total flour weight
The Method
I’m a fan of fermentolyse, so I start by mixing the flours and starter and letting the dough rest for about an hour before adding the salt. This step marks the beginning of bulk fermentation, which runs about a total of 6½ hours at 75°F (24°C), using a temperature-controlled proofing box for consistency.
After incorporating the salt, I give the dough another hour of rest, then move into the strengthening phase: two stretch-and-folds followed by two coil folds, each spaced 30 minutes apart. In practice, though, I adapt this to my container and use a simple stretching method rather than textbook folds—and it works just fine.
After roughly 6 hours of bulk fermentation, I stretch and pre-shape the dough and let it rest on the table for 30 minutes before performing the final shaping, focusing on building good surface tension.
The loaf then goes into a banneton for a cold proof in the fridge at 38°F (3°C) for 12 to 14 hours. Baking is straightforward: 450°F (230°C) for 20 minutes covered in a Dutch oven, followed by another 20 minutes uncovered to finish the crust.
Strong Starter, Perfect Timing: The Key to Success
I’ll probably repeat this in every recipe I publish here: most less-than-perfect loaves come down to one of two things—a weak sourdough starter or poorly timed bulk fermentation. Let’s start with the starter.
Create a Strong Starter
I use a simple three-step build, feeding and refeeding the starter in stages to steadily build strength and activity. The day before baking, in the morning, I take a small portion (about 15 g) of my starter and feed it in a separate container with 15 g water and 15 g flour, then let it rest. I repeat the same feeding in the evening. The next morning, I feed it once more with the same amounts, bringing the total close to 105 g—I need 80 g for the recipe. In that final build, I use that extra flour and water to account for what inevitably sticks to the jar. What matters most is this: during that last step, the starter should rise vigorously and be ready within about four hours—active, airy, and at its peak—right when it goes into the dough.
Important note: Treat your main starter the same way—run it through the same feeding cycle, then refrigerate it just before mixing your next dough. This way, you’re storing it at peak strength, not after it has already begun to decline.
Bulk Fermentation Time is Key
The relationship between dough temperature, starter percentage, and bulk fermentation time should not be underestimated—it’s one of the biggest levers you have for consistent results. My own baking improved dramatically once I started paying attention to these variables. While not essential, a temperature-controlled proofing box is a worthwhile investment if your budget allows. Otherwise, a simple food thermometer will do the job—measure your dough temperature and adjust the bulk fermentation time accordingly.
The tables below illustrate how temperature and sourdough starter (levain) percentage influence bulk fermentation time:
| Levain | Bulk Fermentation |
| 5 – 10% | 8 to 12 hours |
| 10 – 20% | 6 to 8 hours |
| 20 – 30% | 3 to 6 hours |
| 30 – 40% | 1 to 3 hours |
| Dough Temperature | Bulk Fermentation |
| 80°F / 27°C | 5 to 6 hours |
| 75°F / 24°C | 6.5 to 7.5 hours |
| 70°F / 21°C | 11 to 12 hours |
| 65°F / 18°C | 15 to 16 hourss |
I settled on 75°F (24°C) because the resulting bulk fermentation time fits my daily schedule best. Based on the tables above, that points to about 15% levain (relative to total flour weight) and roughly 7 hours of fermentation. However, my formula includes 30% stone-ground bread flour, and that changes the equation. Flours that retain more of the grain—like whole wheat or rye—tend to ferment faster due to higher nutrient and enzyme activity. As a result, I shorten the fermentation time slightly to 6½ hours to stay in control of the dough and avoid over-proofing.
A Word About the High Hydration
This recipe runs at 80% hydration, which is on the higher end. Part of that choice comes from the stone-ground flour, which naturally absorbs more water than standard flour, but the bigger goal is a light, open, and airy crumb. That said, high-hydration dough can be tricky, especially if you’re new to it. The key is not to fight the dough, but to guide it—pay close attention during your stretch-and-folds and, even more importantly, during the final shaping. Focus on building proper surface tension. Once that structure is in place, the dough becomes far more cooperative and noticeably less sticky.
The Final Verdict
Needless to say, while I don’t have a direct side-by-side comparison to the bread served at the restaurant, I’m more than satisfied with the result. The stone-ground flour brings a deep, almost rustic flavor, nicely complemented by the levain’s subtle, pleasant tang. That said, I’ll tweak the baking process slightly next time to match my personal preference—I like a darker, thicker crust.
Professional bakers typically achieve this with a strong burst of steam at the beginning of the bake and higher temperatures, sometimes up to 500°F (260°C). The steam keeps the crust flexible during the initial phase, allowing for better oven spring, while the higher heat promotes a bolder, thicker crust. At home, I’ll aim for a similar effect by preheating thoroughly, baking at around 480°F (250°C), and using a larger covered baking vessel. The increased enclosed space should help create more steam released from the dough itself plus the help of an ice cube, assuming that more internal steam retention can support better oven spring and crust development.

Take your sourdough baking beyond the basics with Hannah Dela Cruz’s inventive and highly practical collection of recipes. From rustic loaves and soft sandwich breads to flatbreads, crackers, pasta, breakfast staples, and desserts, this book shows how to make the most of both your active starter and your discard.
A self-taught baker, Hannah has a way of making sourdough approachable without oversimplifying it. She walks you through the entire process—from creating and maintaining a starter to baking your first successful loaf—then gradually expands into a wide range of recipes that build confidence and skill without feeling overwhelming.
Her recipes strike a balance between classic and creative. You’ll find familiar breads like a Whole Wheat Country Loaf alongside more adventurous options such as Mexican Hot Chocolate Rye or Semolina Chili-Cheddar Loaf. There’s also a strong focus on breads that fit into everyday life—Honey Butter Rolls for sandwiches, or enriched and filled breads like Sweet Potato–Cardamom Buns, Garlic Butter Couronne, and Cherry-Chocolate Babka.
Where the book truly stands out is in its approach to discard. Instead of treating it as a byproduct, Hannah turns it into an opportunity. Her discard recipes cover everything from breakfast and snacks to pasta, dumplings, cakes, cookies, and desserts—each one making practical use of what would otherwise be thrown away, while adding that subtle sourdough depth of flavor.
Whether you’re just starting out or already comfortable with sourdough, this is the kind of book that keeps you baking—not because you have to, but because you’ll want to try what’s next. More information…